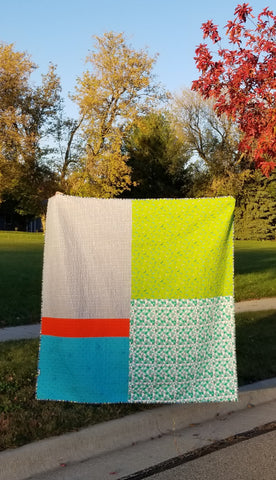
Pieced Backings - A Quick How-To
There's lots of different ways to make a pieced back for your quilts.
My favorite way is to grab big chunks of fabric, left over or cut off from other quilt backs, and puzzle them out on the wall until I find a layout that fits.
But you can also make extra blocks or use orphan blocks you have on hand and piece around those.
I make plenty of backs with the typical one seam, same fabric, but for scrap quilts it seems fun to make a scrappy back.
If you'd like a quick run down & some tips, scroll alllllllll the way down! 👇
Basic Backs

The quickest way to add something extra is to slice the backing (I prefer off center) and add a pop of accent fabric in.
Don't forget to factor the seam allowance in your cut though!

You can go as big or as subtle as you want!
For this baby quilt I wanted to use up the feature fabric, but didn't have enough of any of the other prints to fill it out, so I opted for solids close to the colours in the quilt top.

This one uses coordinating prints, just pieced together in columns. It adds interest without adding bulk.

Here I used three sets of yardage (I only had a yard of each) and two scraps from the Backings Bucket.

You can have fun with with these & use as many or as few fabrics as you'd like.

This is goin with the "basic backs" simply because it is all yardage.
There's no orphan blocks or fabric from the front here. I simply cut a bunch of my solids up, pieced them in rainbow order & paired it with some of the loooooong cuts in my backings bucket!
I think it's fancy, but it was extremely simple to make!
Fancier Backs

This is one of my very first pieced backings. I used left over four patches from the front, surrounded them in two little frames & added that to the yardage I had.

And this followed shortly after. The greys are prints left over from the front, the blue is the background I used, and the rest of the fabrics were coordinating prints from past lines (this was using all Corey Yoder prints)

Here's my most recent pieced back - the strips of floral are all that's left from my top, and the triangles are the extra blocks I made.

I miss cut this berry but couldn't bring myself to toss it, so I added it (along with some extra blues from the front) to the back.

Log Cabin blocks are my favorite way to use up scraps. This back has five blocks that didn't make it on to the front, two fat quarters, two long strips left over from other quilts, and the cute scallop fabric is yardage I hoarded for almost a year.

This is entirely made up of leftovers from the front. I bought extra since I was ordering online & turned some into Half Square Triangles, pieced some on the diagonal for interest & used the tiny strips trimmed from other places, too.
My fanciest so far, I think 😉

This uses yardage on the left, scraps in between the Swoon blocks, and solid yardage on the right. A Full sized monster of a quilt that I tackled far too early in my quilting career, and the prettiest pieced back so far!
Tip Time!
I recorded a little video working on a pieced back but I'm not the best at technology & can't get it to upload here - but if you click here you can watch it!
My favorite tip is to measure out your back & mark it. I do this with washi tape since it doesn't leave residue.
I work on my design wall, but if you've got the space to lay it out on the floor or a bed, use what you have!
Remember to overlap your pieces as you go, since you'll need factor in the seam allowance.
Bigger is better than smaller, so if you're measurements go a little over, that's fine! 👍
Pull out the main pieces you want to use first.
Do you have yardage you'd like to feature?
Or are you building around some orphan blocks?
Use what you have.
Did you want it to be all orange, but don't have enough?
Throw in some yellow. Or white. Or go all out & toss in blue.
I always start by pulling the colours from the front of the quilt & letting it run from there.
If you're worried it'll be too much, try just adding a strip of something sassy first.
Build your way up to whatever you're comfortable with!
If you're using scraps for your scrappy backings, then remember they've already been used once & now you can just play with them.

I am trying to end the year with a plan and finish what I can before January. This gave me some great ideas for how to use leftover pieces like HSTs from a couple of the quilts I haven’t chosen backing for! I’m pretty excited to try some of these out now. I typically just use yardage and do the single seam but I hate how much extra that usually leaves and then I have so many leftover little pieces from the front. Not anymore! :)